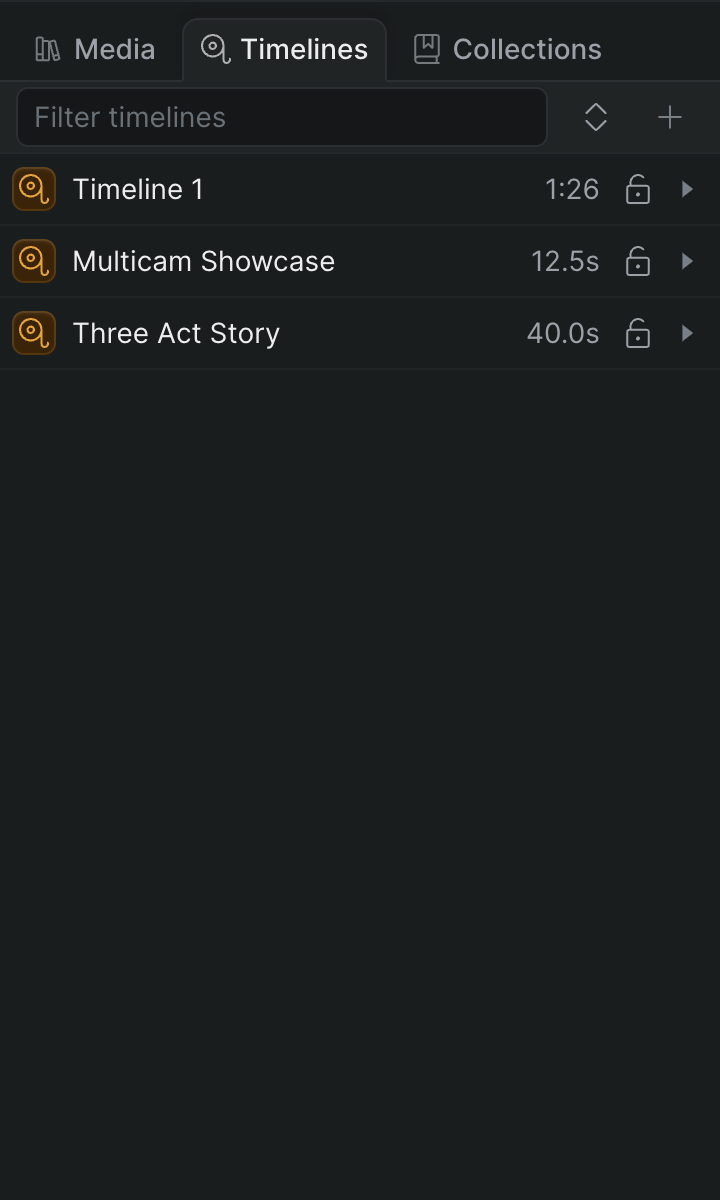
A timeline is a single edit — a sequence of clips you trim, arrange, and play back. Every timeline in a project lives in the Timelines tab of the library. The tab shows your project's storytree: a list of every timeline, with any nested timelines shown beneath the one that contains them.
Open the Timelines tab to create a new timeline, browse and open the ones you already have, and rename, duplicate, or delete them. To change a timeline's resolution and frame rate, use the Video Settings module in the Inspector.
Create a timeline#
- In Sequence, open the project and select the Timelines tab in the library.
- In the control bar at the top of the tab, click the + button.
- Choose New Timeline for a standard edit, or New Multicam Timeline to sync camera angles and cut between them (or press N to create a standard timeline). Once footage is on a multicam timeline, see Switch multicam angles to add angles and cut between them.
Sequence adds the timeline to the storytree, opens it in the editor, and selects its name so you can type a new one right away. Press Return (Windows: Enter) to confirm the name.
Tip
When a project has no timelines yet, the Timelines tab shows a starting screen instead of a list. Click New timeline or New multicam timeline there to create your first one.
A new timeline starts with the resolution, frame rate, and pixel ratio you most recently set on a timeline in this project — or the standard default, before you've set any yourself. When you add the first clip, Sequence conforms the timeline to match that clip's format — see Set a timeline's resolution and frame rate to adjust it yourself.
Open and browse timelines#
- In the Timelines tab, click a timeline to select it and open it in the editor.
- To narrow a long list, type in the Filter timelines field in the control bar. The list keeps only timelines whose names match.
- To reorder the list, click the sort control in the control bar and choose Added, Name, or Duration. Click the same field again to reverse the direction.
The active timeline stays open in the editor while you browse, so switching between cuts is a single click.
Work with nested timelines#
A timeline can contain another timeline as a clip. In the storytree, a timeline with nested timelines shows a chevron on its row.
- To reveal a timeline's nested contents in place, click the chevron on its row.
- To drill into a nested timeline and browse it on its own, double-click its chip at the start of the row. Click the Back button in the control bar to return to the level above.
To collapse clips you already have on a timeline into a new nested timeline, or place an existing timeline as a nested clip, see Nest clips into a timeline.
Rename a timeline#
Do either of the following:
- Double-click the timeline's name in the Timelines tab, type the new name, and press Return (Windows: Enter).
- Right-click the timeline and choose Rename, type the new name, and press Return (Windows: Enter).
To discard your change while editing the name, press Escape.
Duplicate a timeline#
Duplicate a timeline when you want to lock in the current cut but keep iterating — the copy is independent, so edits to one don't affect the other.
- In the Timelines tab, find the timeline you want to copy.
- Right-click it and choose Duplicate.
Sequence adds the copy to the storytree.
Delete a timeline#
- In the Timelines tab, right-click the timeline you want to remove.
- Choose Delete Timeline.
- In the confirmation dialog, click Delete.
Sequence removes the timeline from the storytree.
Warning
Deleting a timeline removes that edit from the project. Duplicate it first if you might need the cut later.
Set a timeline's resolution and frame rate#
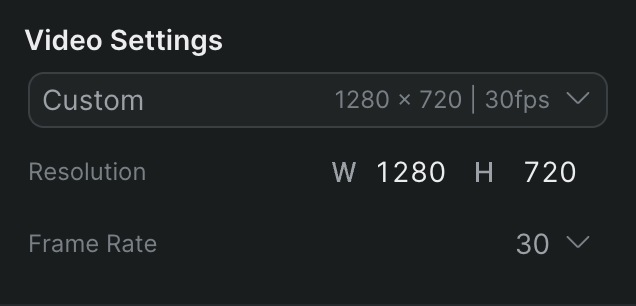
When a timeline is selected, its controls appear in the Video Settings module of the Inspector.
- Select the timeline in the Timelines tab.
- In the Inspector, open the Video Settings module.
- To apply a standard format, choose one from the preset dropdown at the top of the module.
- To set a custom size, type values in the Resolution width and height fields.
- To change the frame rate, choose a value from the Frame Rate dropdown.
Your changes apply to the selected timeline immediately.
Note
Lock a timeline to protect its settings and contents from edits. Right-click the timeline and choose Lock; choose Unlock to allow changes again. You can also use the lock button on the timeline's row.
Keep playback smooth#
For the best performance, set a timeline's format to match the clips you're editing:
- Set the timeline's resolution and frame rate to match the majority of your clips, so Sequence isn't rescaling or retiming footage during playback.
- Follow the guidance in Media Formats for the formats Sequence handles best.